NMKR make creating NFTs/Tokens on the Cardano network easy. They do all the complex under the bonnet blockchain stuff for you.
Their documentation is good, their whole platform is really good, but if you’re new to blockchain and Cardano then there’s a fair bit of assumed knowledge that it seems they expected you to just know or want to research.
This guide walks you through every step from zero to creating a NFT token that is minged on the Cardano blockchain usign NMKR.
Mainnet or Testnet?
You probably want to experiment with minting a bit before you start spending real ADA doing it. If so you need to use the Testnet instead of Cardano Mainnet, so everything is free.
The process of minting is the same for both, but everything is created separately for each. So for Testnet you’ll need to create a Cardano Wallet on the Cardano Testnet and then use the Testnet version of NMKR Studio (which you’ll need to create a new account in too).
Create a Wallet for the Cardano Blockchain
There are lots of wallet plugins you can use, we’ll use Eternl. You can get the Eternl plugin for your browser here.
Once you have is Create a new Wallet.
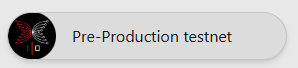
If you are using the Testnet then before you do, select the “Pre Production Testnet” network using the bottom right button:
If not, ensure “Cardano Mainnet” is selected.
Now create your wallet. Cardano wallets are created using a 24 word seed phrase, keep it somewhere safe. For a Testnet wallet you don’t need to be too careful because its not real money, but for a Mainet wallet write it down and keep it very safe (if anyone else ever got that 24 word seed phrase they can instantly steal all the ADA you store in the wallet).
Once you have a wallet you’ll need some ADA in it.
For Mainet you’ll need to buy some with real money. Use the ‘Buy ADA’ button.
For the Testnet you can get some for free. Press the Receive button and then copy the wallet address (it will look something like this: ‘addr1q9mgtvh0kc………’). Now go to the Testnet Faucet, select “PreProd Testnet”, “Receive Test ADA”, paste the wallet address into “Address” and press “Request Funds”. Your wallet should receive a nice balance of test ADA within a minute or two.
So, now you’ve got a Cardano wallet with some ADA in it.
Startup NMKR Studio
For the Mainet NMKR Studio go to: https://studio.nmkr.io
For the Testnet NMKR Studio go to: https://studio.preprod.nmkr.io/wallets
Setup a new wallet
From the left side Dashboard select: Settings > Wallets
Press the “Enter New Wallet Address” button.
In your Eternl wallet press the Receive button and then copy the wallet address (it will look something like this: ‘addr1q9mgtvh0kc………’).
Paste it into the NMKR Wallet Address box.
Write a user friendly name like “My wallet 1” in the Comment box and press Save.
Create a NMKR Project
From the left side Dashboard select: Create > NFT Minting
Create a new project
Select the Cardano blockchain
Select “Non fungible token (NFT) project”
Give the Project a name
The rest of the fields can be left blank, press Next
Enter the Cardano settings
Select the CIP Standard you want
“CIP25” is the original NFT standard for Cardano and is fine for simple NFTs where you won’t want to change metadata you store in the NFT after it’s been created (metadata being the information and image you store in the NFT token).
“CIP68” is a new NFT standard for Cardano that gives you the option of altering metadata after te NFT has been created. All very nice, except it’s more expensive because NMKR will have to create an additional “Reference Token” along with main NFT token and that costs more ADA.
For this project we don’t want to change metadata later, so we’re select CIP25.
For the Policy select New policy
Policy script will lock: No (if you turn this on you will be setting a date after wich the policy can’t be used any more to mint new NFT tokens)
Press Next.
Enter the metadata fields
This is where you define what metadata (information) you will be storing in the NFT. If you want to use the “Social fields” and “Static fields”, you are setting the actual data that will go into the NFT.
For the “Placeholder fields” you are storing the name that will be used, but the value you assign to it for each NFT you mint will get added when you actually mint the NFTs.
Each NFT token you mint will get written to the Cardano blockchain and stored on it for all of eternity (literally!). Be careful with how much data / values you want to store in each NFT token. When you mint each onet there is a base cost in ADA to mint it, but if the amount of metadata / values you are storing is bigger than minimum NFT token size then you will have to pay additional ADA for the extra bytes it uses.
Dont’ worry about images and files your NFT will be linked too – they get stored separately from the NFT token itself, the NFT simply references where they get stored (their URL basically).
For our project we’re entering our website URL in the Social fields website (including the “https://” and Placeholder field names “Filename” and “Hash”, but you can do as you wish.
Complete creating the new project.
Set the NFT minting Price
Even if you’re going to jsut mint a few NFT tokens for youreself, you need to set a price to do it.
From the created Project select: Manage Project > Set NFT prices
Create new price
Count Nft/Tokens: 1
Price: Creating a NFT token costs ADA:
NMKR charge a fee to use their service
The Cardano blockchain charges a small fee to add it to the blockchain
The Cardano blockchain also insists on passing a small amount of ADA to the wallet that the NFT token is sent to (it does this to prevent spamming people with NFT’s – it’s costs money to send them!)
Set it to 10 ADA for now and we’ll reduce it in a moment
Set the Currency to ADA (other currency options are for it you will use the NMKR service to sell your NFT tokens the end customers)
Price activated: On
Now look at the breakdown section of the price you just created:
Deposit back to purchaser: You will get this back if you are going to mint the NFT token and pass it to your own wallet – if so this isn’t a real cost as its returned to you.
NMKR and Transaction Fees: This is what it’s going to cost you to mint the NFT token.
You will receive is ADA that will be returned to the wallet you use to pay for the NFT minting. Again this is a Cardano blockchain requirement to prevent spamming. The minimum amount is around 1 ADA, so you can now edit this price and reduce the cost to get this down to around 1 ADA (NMKR will tell you if you set the price too low after changing it).
Get the metadata template
From the left side Dashboard select: NFT Minting
Select Edit Project
Select the Metadata Template tab
On the right side where it says Preview, select the tab next to it that says “CARDANO – CIP25”
Copy all of the liens of the metadata, paste it into notepad or whatever text editor app you have.
Press the Cancel button to exit.
Create a token thats ready to mint
From the left side Dashboard select: NFT Minting
Press the “Manage Tokens” button in your project
Press the “Upload & Pin new NFT” button
Description tab
Tokenname
The name of the NFT token when stored on the blockchain.
You can use up to 32 characters, no special special characters, no spaces.
If you’re creating a NFT project where you’ll end up issuing, more than one NFT token its a good idea to use a nameformat that will incorporate an incrementing nbmer say, e.g. my_nft_token_0001
Displayname
Optional. You can use up to 63 characters, including special characters and spaces.
Blockchain viewers will typically show the more human friendly Displayname if its been set instead of the Tokenname.
Description
Optional. You can use up to 63 characters, including special characters and spaces.
Select “Price from API/Pricelist”
We set all 3 fields with some text for our test project like this:
Tokenname: test_token_name_0001
Displayname: My test token 0001
Description: This is token numbered 0001 for my test project
Press Next.
Files tab
Select (Upload and PN Files directly
Press Upload & Pin, select an image file you’d like to use for the NFT token. (This image will get stored on the IPFS service, the NFT token will just store a reference to it,. This is because NFT tokens are small, but image files can be big!)
Press Next
Metadata Override tab
Get the complete metadata you copied earlier and paste it in here.
Don’t change the <asset_name>, <display_name>, <policy_id>, <ipfs_link> and <mime_type> placeholders.
However any other placeholders (in angle brackets, like this: “<field_name>”) you can now set with the values you want to be stored in this unique NFT token. Ensure you leave the double quotes for each value.
In the Project creation step earlier we used the following placeholder field names “Filename” and “Hash”, so we’ll now replace them with some test values like this:
“<filename>” becomes “myfile.doc”
“<hash>” becomes “abcd9876”
Press Save NFT
A single NFT token has been created onthe NMKR platform. Its not been minted and added to the blockchain yet, that comes next.
Add NMKR Mint Coupons
Minting the NFT so that it is stored on the Cardano blockchain costs ADA. If you we’re using NMKR to sell the NFT tokens you create to custoemrs for you then you wouldn’t need any Mint coupons, but we’re going to manually mint it so we need some.
If you’re using the Testnet then of course this is free, but you still need to go through the steps of buying them with testnet ADA.
In NMKR Studio press the Dashboard button top left. Part way down you’ll see the option to buy Mint Coupons. Press it.
Select Cardano, select say 10 Mint Coupons to see the cost in ADA, Press the Purchase button. Youll need to enter the pasword you set when you created the wallet (the password, not the seed phrase -you never ever enter the seed phrase anywhere unless you are using it to add the wallet on say a different device).
In the popup window Payment details section, copy the “Sending to” address.
In your Eternl Wallet, select Send, paste in the address you just copied, enter the amount of ADA to send to buy the Mint Coupons (say 10 ADA), then press Sign transaction.
Wait a minute or two and you’ll see the Mint Coupons balance update once NMKR has received the ADA. (Eternl will say the transatcion is pending until it gets a slot to add the transaction onto the blockchain – you don’t need to do anything).
You’re all set to mint your NFT token.
Mint the NFT token
From the left side of the NMKR Dashboard select: NFT Minting
In your project select: Manage Tokens
In the token you created select: Sell NFT > Mint & Send
Select the Cardano Blockchain
In your Eternl wallet press the Receive button and then copy the wallet address (it will look something like this: ‘addr1q9mgtvh0kc………’).
Paste the address into NMKR
Press the Mint and Send NFT button
Thats it! NMKR now mints the NFT token onto the Cardano blockchain and after a short delay you’ll see the token maked as Sold in NMKR.
If you select “Transactions” from the left Dashboard you’ll see some Mint Coupon balance was used to mint it.
Viewing your NFT token
If you go to your Eternl wallet and select “Assets”, you’ll see that the NFT token you minted has been sent to your wallet on the Cardano blockchain.
Click it and you’ll be able to see it and all the values you set for it. The image file is shown, but if you click “metadata” you’ll see the “ipfs://” URL for the image file. NMKR actually stored it with the IPFS file storage service for you – its not stored in the NFT token itself, its too big, just this refernece to where it is stored gets put in the token.
You now own that NFT token, your wallet that you control owns it on the Cardano blockchain.
Viewing on NMKR
If you go back to the NFT token in NMKR (Daskboard > NFT Minting > Your Project > Manage Tokens), you can see it there. Its not the actual NFT token itself though, NMKR don’t make it very obvious, but what it is showing you is actually the NMKR token object that it used to mint it.
If you click its “AssetId” value you’ll be taken to the Cardanoscan website where you can see all of the data associated with that NFT token that was stored on the Cardano blockchain as it was minted.
If you send it from your Eternl wallet to some other wallet, you’ll see new transaction data appear for it on cardanoscan. The NFT token data itself will always be there, stored forever in the block it was created in. Sending it form one wallet to another doesn’t change that (it can’t, data stored in vblocks on the blockchain can never be changed), it just add a new treansaction into a new block being written to the blockchain that references the NFT Token and assigns the ownership of it away from the wallet sending it and to whatever wallet it was sent to.