
The HC-05 is widely used as a cheap simple just works transparent Bluetooth serial link. It can be configured to be host or slave, which means you can use two of them to create a paired link that passes your UART comms over Bluetooth.
Parts
HC-05 Bluetooth Serial Transceiver, you want the HC-05 that is mounted to the 6 pin breakout/interfacing board like in this picture:

HC-05 vs HC-06
The HC-06 is a 4 pin slave on only variant, whereas the HC-05 can be configured to be a master or slave Bluetooth device. Most of whats detailed here also applies to the HC-06.
Using the HC-05 to wirelessly program an Arduino
See our other page over here.
HC-05 pins
Power and IO Pins
Power with 3.3V to 6V.
An onboard voltage regulator converts Vin to 3.3V to power the HC05. This means that IO signals are 3.3V, not 5V. When connecting to a 5V Arduino, signal inputs into the HC-05 must have their voltage dropped (e.g. using a 1K2 + 2K2 resistors potential divider).
Note that because the HC-05 has its own voltage regulator, there may be signal voltage differences to another 3.3V device you connect to it. If powering the HC-05 with 3V3 this will be even more relevant because the voltage regulator in the HC-05 will cause some voltage drop. Using a series resistor on each signal (e.g. 100R) to interface signals to another 3.3V device is good practice.
STATE pin
Default usage is that this pin goes high when a connection is made (can be connected to a LED for instance). However, we re-configure it to go low when a connection is made and connect it via a series capacitor so that it gives a brief reset pulse to the Arduino RESET pin when a connection is made (the Arduino software starts its programming operation).
This works because Bluetooth does not maintain a constant connection even though it remains “paired”. It only remains connected when data is actively being sent or received, otherwise the connection automatically terminates. When you hit the upload button, your computer will initiate a connection, when the upload is done and all data is sent, the connection will be automatically terminated. The same happens when you open a serial monitor. The connection will remain active until you close the serial monitor, then it will automatically terminate.
EN
This is connected to the push button (it’s not the voltage regulator enable pin as shown on some schematics).
PIO11 (Key) / Push Button
Pulled low on the HC-05 breakdown board, but tied high when the push button on the board is held.
When the HC-05 is powered on with PIO11 pulled high it enters its special command mode and will accept AT commands.
When the HC-05 is powered on with PIO11 pulled low it enters its default running mode.
LED
Fast flash – HC-05 is in running mode, ready to connect
Slow flash (approx 2 secs) – HC-05 is in config mode (will accept AT commands).
2 flashes every few seconds – linked to remote device (transparent serial bridge).
Design Notes
The HC-05 incorporates a low drop out voltage regulator, so it can be powered from 3.3V to 6V. Its signals are 3.3V though. Here’s a schematic we came across:
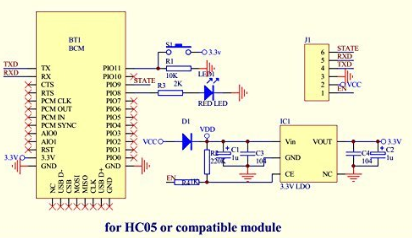
Note the EN pin is wrong on this schematic, it’s actually connected to POI11 / the push button.
This means if you are using it with a 5V Arduino, you’ll need a 1K2+2K2 potential divider on the Arduino TX pin to the HC-05 to lower its voltage and make it compatible with the HC-05. The Arduino RX pin will be fine to directly connect as long as it will accept a low input voltage as a high state (the Uno does for instance), otherwise you’ll need to boost the voltage up to 5V – see here.